DNA Extraction
DNA Extraction from Single Spores
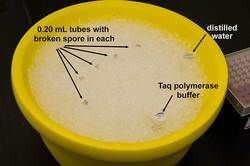
DNA can also be extracted from individual spores by placing spores into microcentrifuge tubes along with approximately 2.0 µl Taq polymerase buffer. Spores are then crushed using either a pipette tip or a microfuge pestle to release the contents of the spore. This process is done under a stereomicroscope. Once the spore contents are released, we add 14 µl cold Taq polymerase and shake to mix the contents. The tube is then put into a water bath at 94C for four minutes in order to denature DNase. The DNA is then ready for PCR amplification.
Preparatory steps
Contamination can seriously jeopardize any effort to PCR a pure product from a fungal spore, especially if other activities involving fungal material of any kind take place anywhere in the same lab where DNA is to be extracted. All it takes is one hyphal fragment and voila! Since we are a fungal collection, extra precaution is needed—even to the point of “overkill”.
- Bring water bath to steady-state 94°C.
- Fill two ice buckets with chipped ice: (1) for all thawed reagents and (2) for DNA and PCR products.
- Thaw Taq polymerase buffer (usually shipped with the Taq enzyme) and place on ice.
- Label microfuge tubes (one for each spore sample).
- Sterilize pestles (one for each spore sample)
- Sterilize Pasteur pipettes with extruded tips (one for each spore sample) and pipette bulbs.
- Sterilize a watch glass for each spore sample.
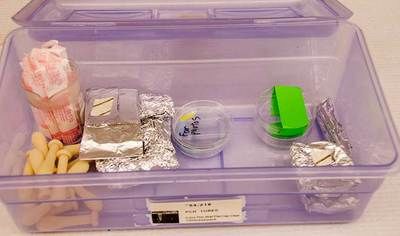
All items listed above are wrapped in tin foil and autoclaved at 121°C for 15 min. and immediately stored in a presterilized plastic box (cleaned with 70% alcohol).
- Remove as much of the water as possible from around the spore.
- Add a small volume of Taq polymerase PCR buffer (~2.0 µl) to help pick up the spore from the watchglass.
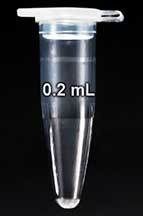
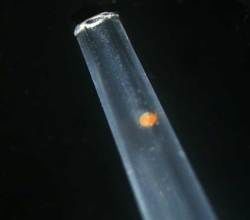
- Use a sterile pipette tip (P2 pipettor) to transfer one spore to a 0.2 mL microcentrifuge tube. Do this under a stereomicroscope so the spore can be seen attached to the tube
 sidewall. This operation requires some manual dexterity—that will come with practice.
 - Place the tube (with affixed spore) in ice. Multiple tubes can be set up (one spore in each) and stored until the start of DNA extraction.
- Press against the spore inside the tube with either a microfuge pestle or a pipette tip to crush it and release contents. Again, do this under a stereomicroscope to watch the spore and verify that spore contents have been released (along with DNA). The spore is in such a small volume of liquid that the spore won’t slip around much. Pipette tips are most effective for breaking larger spores.
| Spore in drop on tube wall | ||
|---|---|---|
 | 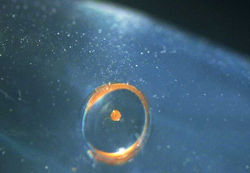 | 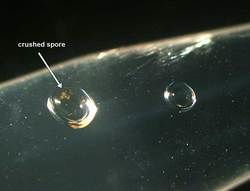 |
- Scrape the pestle along the wall of the tube as you remove it to ensure that the spore isn’t “riding along” and is removed as well.
- Once the spore is broken, quickly add 14 µl of ice cold Taq polymerase PCR buffer, shake contents so they rest at the bottom of the tube and place on ice.
- Once a spore is broken, the tube must be placed immediately in the water bath (94°C) for 4 minutes to denature DNase.
- At the end of 4 minutes, immediately place the tube on ice. This DNA now can be used for PCR amplification immediately or stored at -20°C. The former generally gives more consistent results
Spore extractions can be staggered at one minute intervals if one has multiple timers or a multi-programmable timer.